Wednesday, 10 June 2015

SMTP Testing

Troubleshooting SMTP Connectivity

On a few occasions, I've encountered application developers having difficulty with their application when it tries to send an email via an internal Exchange (or other SMTP) server.  This email might be part of a workflow or notification of a job completing, for example.

If you want to see what's happening, outside of the developer environment, running a few SMTP commands from the developer's computer can help.

First, you need to telnet to port 25 on your Exchange or SMTP server.  Then, send an email to a sample recipient and see how you get on.  Hopefully, if there is a problem with authentication or anti-virus or something similar, you will get stopped along the way and you'll be able to troubleshoot the cause.

SMTP commands

The commands in yellow, above, are my user input.  The rest of the text is messages that SMTP responds with.  Note that it is sensitive to spaces in the correct places and I've found that using backspace to correct typos from a Windows command prompt does not go down well.  Type carefully!

  1. ehlo domain.local - here, I am announcing where I am coming from
  2. mail from: sender@domain.local - this is the sender address
  3. rcpt to: recipient@domain.local - this is the recipient of the email
  4. data - announcing that I have finished the addressing and am about to start with the data
  5. subject: Test Message - the subject line of the email
  6. . - I have finished my input and the email may be sent

Getting stopped or getting different messages at different stages along this path will mean different things, but this will hopefully put you in the right direction.

Friday, 5 June 2015

Group Policy Troubleshooting

Group Policy Troubleshooting

From time to time you may find yourself trying to identify what group policy (GPO) settings have been applied to a particular user or computer and what policy they have been applied from.  The Old Faithful of group policy troubleshooting is running gpresult from a command line.  While this is the tool that has been recommended on courses for years (even up to a Windows 2008 R2 course I attended a couple of years ago), I've always found the results from this lacking in detail.

RSOP.MSC

What I find most useful is to run rsop.msc from your Start...Run box.  RSOP is Resultant Set Of Policy and it loads as a MMC snap-in.  This snap-in will let you browse through the GPO objects and it will let you see the configured settings and, crucially, the name of the policy that it has applied from.  This will help you through difficulties that you might have with understanding the hierarchy of policies from Site, Domain, OU and Local.

Group Policy - Resultant Set Of Policy

In this next image, you can see the names of the policies that have applied to the computer (or User Configuration, if you select the properties on that).
Group Policy - Resultant Set Of Policy


rsop.msc will also let you see errors that caused particular policies not to load and security settings that may also be preventing a policy from loading.

Group Policy Modeling

One failing of running rsop.msc on your local system is that Group Policy Preference settings are not visible.  These preferences were introduced to Group Policy in Windows Server 2008 and provide GUI based configuration settings.  For example, you can get very specific with local user account settings or Internet Explorer settings using Group Policy Preferences.  Unfortunately, rsop.msc hasn't caught up with this yet.

However, using the Group Policy Modeling wizard in your Group Policy Management tool on a domain controller, or through your local administrative tools, you can see what Group Policy Preferences will be applied.  You can also go through a lot of 'what if' scenarios to see what would happen if, for example, group memberships are changed.

Tuesday, 2 June 2015

Troubleshooting Windows Domain Account Lockouts

Troubleshooting Windows Domain Account Lockouts

Finding out why a user is continually being locked out on a particular day can be a challenge.  A person may have logged onto a computer a few weeks ago but has forgotten about it.  Identifying where rogue session is can be difficult.  On a more sinister note, a user might be locked out from time to time and know that they didn't type a password incorrectly and pinpointing the source of these lockouts is important.  The built-in filtering on the Windows Event Logs, while useful in some circumstances, isn't always the most useful at helping out with this.

Worry not!  Microsoft provide a number of tools to assist with this.  You can download them from here and the two that I'm going to talk about are Eventcomb and LockoutStatus. These two tools do two different jobs and can be very useful individually or together.

http://www.microsoft.com/en-us/download/details.aspx?id=18465

Eventcomb

Eventcomb is a event log interrogation tool that will look for events that match your criteria and output them to a file.
To search for account lockouts, use settings similar to below.  You can fill in most of these details by going to Searches, Built In Searches and selecting Account Lockouts.  Note that if you are searching on DCs that are newer that Windows Server 2008, you will need to add event IDs 4740 and 4625 to the built in list of Event IDs.
If you right-click in the window "Select to search/right click to add", you can choose all DCs in your domain.


Lockout Status

Lockout status is a handy tool for seeing when an account was locked out, what domain controller it was locked out on and when passwords are due to expire.  OK, the password expiry might need a bit of mental arithmetic by adding number of days in your maximum password age policy to the 'Password Last Set' field, but it's a great help.

These are two great utilities that Microsoft provide for free that will help you troubleshoot lockouts and identify where problems are coming from.

Friday, 29 May 2015

Extend the System Drive of a Windows Server 2003 Virtual Machine

Increase the size of the system drive of a Windows Server 2003 virtual machine

So, you have a Windows Server 2003 machine in a VMware or Hyper-V environment and you want to increase the size of the C: or System drive.  After you have allocated more space on the virtual hardware side, your Windows server may recognise it but not let you work with it.  When you try to use diskpart to extend the disk, you might get an error that says:

The volume you have selected may not be extended.  Please select another volume and try again.

The volume you have selected may not be extended.  Please select another volume and try again.

Fortunately, this is quite straightforward to get around.  Unlike Windows Server 2008 and 2012, this cannot be done on the fly (without 3rd party tools) so a reboot is required.  Here's what to do.

Short version

Boot off a Windows 2008 DVD, go to Repair and use diskpart to extend the volume into the free space.
Diskpart - increasing the size of a disk

Long Version


  1. Boot the virtual machine from a Windows 2008 DVD.
  2. When it boots up, select your language and choose to Repair the installation.
  3. Select the command prompt.
  4. Run diskpart to access command line disk tools
  5. Type list disk to identify the number allocated to the disk that you want to extend
  6. Type extend disk 0 (where 0 is the disk that has the free, extendable space)
  7. Type exit and reboot to make use of the extra space.  Your virtual machine might need another reboot as it thinks there's new hardware there, so now would be a good time to do it.
As always, it would be prudent to backup up any data prior to this procedure - just in case.

Friday, 8 May 2015

Microsoft Exchange - Automatically Forward Emails From External Senders

Automatically forward emails from external senders to internal and external recipients


Consider a scenario where every email that you receive from an external email address to a specific email account, perhaps an alert/monitoring account, needs to be sent onto a number of people - some internal to your organisation and some external.

It's possible to do this with a rule in Outlook, but you can also do it administratively from your Exchange server.  Here's how to do it.

  1. Assuming that all of your internal recipients are already on your Global Address List, create Contacts for the external recipients with their email addresses in the Exchange Management Console.
  2. Create a distribution group that contains all of your internal and external contacts.
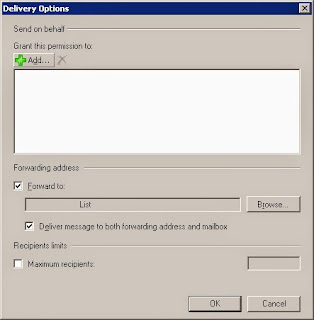
  3. Go to the properties of the email account that will be receiving the original or trigger email and go to its delivery options.

  1. Browse for the group that you want to forward to and if you want the original recipient mailbox to continue to receive the emails, rather than just forward them, tick the box for 'Deliver message to both forwarding address and mailbox'.
Microsoft Exchange - Distribution Group Message Delivery Restrictions

  1. Now, to ensure that all recipients will receive the email, go to the properties of the distribution group and in the Message Delivery Restrictions for it, untick the box to 'Require that all senders are authenticated'.
This last bit is a bit of a gotcha and not doing it might be a cause of an undeliverable message like this.
Delivery has failed to these recipients or distribution lists:
list@xyz.ie
Your message wasn't delivered because of security policies. Microsoft Exchange will not try to redeliver this message for you. Please provide the following diagnostic text to your system administrator.

Diagnostic information for administrators:
Generating server: xyz.ie
list@xyz.ie

#550 5.7.1 RESOLVER.RST.AuthRequired; authentication required ##rfc822;xyz@abc.ie

That should be it.  It's a useful, centralised way to do this from your Exchange server.

Tuesday, 5 May 2015

Sysinternals Autoruns - Comprehensive Startup Identification

Sysinternals Autoruns - comprehensive startup processes identification

I was looking at my Dad's home PC that had some malware on it and despite my brother cleaning up most of the offending software, there were still some annoying messages at startup indicating that although the offending .DLL had been removed, there was still something calling it and trying to launch it at startup.  The RunDLL error message that was being seen was:
There was a problem starting
C:\PROGRA~1\COMMON~1\System\SysMenu.dll
The specified module could not be found.
MSConfig.exe is a built-in Windows tool for showing some startup processes.  Unfortunately, there are many places for a startup process to hide that MSConfig doesn't show.
MSConfig System Information

Luckily for us, Mark Russinovich has created a fantastic tool called Autoruns that shows what processes are being launched and where they are being started from.
Sysinternals Autoruns
The initial screen will show you all of the different startup points - e.g. the Startup folder, HKLM\Software....\Run etc. with the programs and modules that are being launched from each

When you see a line highlighted in yellow, this indicates that the program/module being called no longer exists, but the call still exists.  You can even do a Internet search for details on a particular line right from the application!

The particular piece of rogue software that was troubling my Dad was being started as a scheduled task that had a trigger of 'At logon of any user' selected for its run time.

For me, Autoruns is an important tool in any Sysadmin's toolkit and it will run on Windows XP, Windows Vista, Windows 7, Windows 8 and Windows 8.1.  Although probably less necessary, it will of course run on the server operating systems too - 2003, 2008 and 2012.

Friday, 1 May 2015

VMware ESXi - Brocade Fibre Channel (FC) HBA Installation

Installation of Brocade 425/825 Fibre Channel HBA Drivers on ESXi 5

This is a slightly out of date article, but might be of help to some people.

Brocade's adapter business seems to have been bought by QLogic, so you will need to go there to get the drivers.

  1. Download the drivers  for the Brocade 425/825 FC HBA from here: http://driverdownloads.qlogic.com/QLogicDriverDownloads_UI/DefaultNewSearch.aspx
  2. Upload the driver to your ESXi server using the Browse Datastore feature.
  3. Enable SSH on the ESXi server (Configuration tab...Security Profile...Properties) and start the SSH service.
  4. Put the ESXi server into Maintenance Mode.
  5. Use Putty (or similar tool) to connect to the server and use these commands. Note that my driver file was called BCD-bfa-3.2.1.0-00000-offline_bundle-1108413.zip

  • cd /vmfs/volumes/datastore/<YourUploadedFile>
  • cp BCD-bfa-3.2.1.0-00000-offline_bundle-1108413.zip /tmp
  • esxcli software vib install -d /tmp/BCD-bfa-3.2.1.0-00000-offline_bundle-1108413.zip
  1. Once you get the success message, reboot the ESXi server and exit maintenance mode.
  2. Confirm that the HBA has been installed by going to the host...Configuration Tab...Storage adapters.
That should be it!

Wednesday, 22 April 2015

SQL Server - How To Shrink A Transaction Log

How to shrink a SQL Server transaction log that does not want to shrink

Problem

Usually resulting from lack of management of your SQL transaction logs or or an unusually high amount of database transactions, you may find a transaction log that has grown to a large size.  If you do a transaction log backup to clear it, the file size may stay the same.  If you look to shrink the file you can see that there is a lot of available free space in it.  However, if you try to shrink it, it will look successful but the file will remain the same size
Fortunately, this is quite a straightforward problem to fix.

Solution - Short Version

Backup the transaction log for the database.  Change the database recovery model to be Simple and then shrink the file.  It should work this time.  When it's finished and you have verified that the file size has reduced, change the database recovery model back to Full.

Solution - Long Version


  • Right-click on the database and go into tasks and Shrink File.
  • Select the Log file and check the Available Free Space.  You should see that there is a large amount of free space.

  • Close out of this screen and right-click on the database and click Properties.  Under Options, look for the Recovery Model.  Change it from Full to Simple.

  • Go back to shrink the log file and when it has finished, you should see the new size.  You can verify the new file size in a command prompt or Windows Explorer

Don't forget to change the Recovery Model back to Full when you are finished.


Monday, 20 April 2015

VMware vCenter and ESXi 6 Upgrade

Upgrading from VMware vCenter and ESXi 5.1 to 6.0


I recently upgraded our VMware vCenter and ESXI  straight from version 5.1 to 6, skipping 5.5.  VMware have made this a very simple and seamless in-place upgrade and it went pretty much without a hitch.

vCenter Upgrade

First of all, I upgraded my vCenter server so that my ESXi servers would still be managed by it before I upgraded them.  This installation took about an hour to do and the only issue of note related to my SQL server.  The installation and all of the scripts ran fine but the next morning the VMware VirtualCenter Server service was stopped and not starting.  I checked the log folder and opened the most recent vpxnnn.log file in c:\ProgramData\VMware\vCenterServer\logs\vmware-vpx

I found this message:
  • warning vpxd[04720] [Originator@6876 sub=Default] [VdbStatement] Statement diagnostic data from driver is 42000:0:9002:[Microsoft][SQL Server Native Client 10.0][SQL Server]The transaction log for database 'Vsphere5' is full. To find out why space in the log cannot be reused, see the log_reuse_wait_desc column in sys.databases


I checked my SQL Server and the transaction log for this database had grown to over 5Gb in size.  I backed up the log, truncated it, did a shrink on the log file and that sorted it out for me.
The reason that my SQL transaction log had this problem was that I have a scheduled job to backup the log once a day - at about midday.  This is usually fine for day to day operations.  The upgrade must have made a significant amount of changes to the database and the transaction log grew to the point that it filled up.

ESXi Upgrade

After my vCenter server was upgraded, I now had to upgrade the individual ESXi servers.  The main problem that I envisaged was installing drivers for my fibre (FC) HBAs.  I had a little bit of difficulty locating them when I was installing ESXi 5.1.  They were new then, but the ESXi 6 installation would probably have them bundled with it.  It was great to see that there is now an upgrade option and I didn't have to do a fresh install.
Upgrade to ESXi 6

The ESXi upgrade took about 20 minutes per server and went without a hitch.

Overall, based on my experience, the only thing that I would warn about is keeping an eye on your SQL transaction log.

vsphere web client

In upcoming, related, posts I will be talking about how to shrink a SQL Server transaction log that doesn't want to shrink and installing Brocade HBAs on a ESXi 5 system.

Friday, 17 April 2015

Protecting Against Sticky Keys Privilege Elevation Exploit

How to protect your systems against the Sticky Keys Privilege Elevation Hack


In my earlier blog post, I described how sticky keys in Windows 7, Windows 8 and Windows 8.1 can be used and abused to gain administrator access to the computer.  All that is needed is a Windows installation DVD.

This is a serious security flaw that may present significant difficulties for Sysadmins and IT Security staff.  Essentially, anybody who has physical access to one of these Windows systems - i.e. any desktop/laptop in an open office or server that has not had adequate physical security applied to it might be at risk.

There are a couple of things that can be done to help protect against this vulnerability.  While neither of these options mitigate against the sticky keys vulnerability fully, they go a good way towards making it more difficult to exploit.

BIOS Passwords

Most system BIOS configurations will allow you to prevent booting from an optical or USB drive.  Set this and then password protect the BIOS to ensure that it can't be changed.

Full Hard Disk Encryption

A disk encryption product, such as BitLocker or a 3rd party non-Microsoft product, should prevent straight forward access to the system drive after booting from an optical or USB drive.

Thursday, 16 April 2015

Windows Password Recovery - Sticky Keys

Windows 7 and Windows 8 and 8.1 - Privilege Elevation

Sticky Keys. That accessibility feature that has been part of Windows since way back in Windows 95.  Who'd have thought that it would facilitate a privilege elevation vulnerability in a modern OS so easy to exploit that no tools or downloads are required - just an operating system CD.

This flaw has been well discussed on different websites, so I've no problem going into the detail of it here. I didn't believe that it could be possible when I first read about it, but it is really shocking that it is possible to use sticky keys to gain local administrative rights on a Windows system.  I've seen it work from from Windows 7 through to Windows 8.1, so it's a problem that Microsoft clearly are not addressing.

Warning!
If you use this method to reset the password of an account, you will lose access to any EFS encrypted file areas.  Passwords there stored in IE for that user will also be lost.
This method possibly / probably won't work if there's a full disk encryption product installed on the system.

Short Version

It seems that sticky keys runs in an administrator context when it is launched from the Windows logon screen, straight after boot up.
Boot the PC off a Windows installation disk and when presented with the language settings screen, use Shift + F10 to get a command prompt.
Copy cmd.exe over sethc.exe (stickey keys executable), reboot and when you reach the logon screen, use the sticky keys shortcut to activate sethc.exe - which is now cmd.exe.
Now, the world - or that PC at least - is your oyster.  Run GUI programs, copy files - you can do whatever you'd like.

Long Version

If you want to change the password of a local account on a Windows computer, these steps tell you how.
1.     Insert the Windows 7 or Windows 8 (or 8.1) DVD into the computer and start it up. Choose to boot from it when prompted.
2.     When you get to the Setup welcome screen and are prompted to choose your language, press Shift and F10. This will give you a command prompt.
3.     Identify which drive is your system drive. It will probably be C: or D:. You will be able to tell by the contents of the Users folder on the correct drive.
4.     Backup the sticky keys executable by running these commands on the correct drive.
·        cd \windows\system32
·        copy sethc.exe sethc-backup.exe
5.     Replace the sticky keys executable with the command prompt executable
·        copy cmd.exe sethc.exe
6.     Now, type exit, quit setup and let the computer boot up normally
7.     When you reach the login screen, press the shift key on your keyboard 5 times and a command prompt should appear. This command prompt is running in an administrative context so you can run commands to, for example, reset an administrator account
·        net user administrator NewPassword123
Or
·        net user administrator /active:yes


You can also use the command prompt to load up GUI tools - e.g. MMC to gain access to Local Users and Groups, Event Viewer and more.  Files can also be copied on and off the system. 

This is a very serious security flaw in Windows.  Being able to call up unauthenticated administrative access on a machine that you have physical access to is as bad as it gets and may present many organisations with significant concerns.  The fact that it is facilitated by the operating system's own installation media leaves me speechless on the topic.

I'll follow up with another blog post soon with some advice on what can be done to mitigate against this vulnerability.

Wednesday, 15 April 2015

Windows Server 2003 End Of Support

Support for Windows Server 2003 comes to an end

THE END IS NIGH and if you still have any Windows Server 2003 machines running in your environment, it might be closer than you think.  14th July 2015 is the date that Microsoft will stop their support of this hugely popular server OS and it should be in your calendar.  For many organisations, upgrading systems in advance of this date will be a significant challenge because of the logistics of upgrading live systems or moving them to new hardware.

So, what will happen on 14th July?

Firstly and most importantly, Microsoft will stop issuing security updates for Windows Server 2003 after this date.  As the 14th of July is a Patch Tuesday, this will be the last time that these servers will receive scheduled security patches.  Secondly, you will no longer receive support from Microsoft on issues that you have with the OS.


What should I do?  

Upgrade!  If your system is a Windows based system, then you will most likely be looking to upgrade / migrate to Windows Server 2008 (R2) or Server 2012 (R2).
This process also gives you the opportunity to evaluate if a system should be moved to a cloud solution.

How do I do it?

To borrow Microsoft's recommended approach, the upgrade can take place in four phases.  Discover, Assess, Target and Migrate.
Windows Server 2003 End Of Life

Discover

Identify the servers that you have on your network and in your environment that are running Windows Server 2003.  You may find yourself becoming more intimately familiar with these servers than you ever have before!

Assess

Decide on the plan for what you will do with each Server 2003 system.  Some considerations that can be expected in the assessment phase include:

  • Upgrade in place - Do you have enough disk space to do this with a more modern server OS?  After all, it was probably built with the likely requirements of a Server 2003 system in mind.
  • Rebuild or migrate - Will your applications work on a newer OS, including browser and other components?  Do you have the installation media and support for an application that may have been installed 10 or 12 years ago?
  • Replace system - as a big job is being carried out on a system, is it time to replace it with a modern alternative or to look at a cloud solution?

Target

Prioritise, plan and schedule your upgrades.  At this stage you will know what each system will require to bring it up to a new OS - e.g. Windows Server 2008 or Server 2012.  Now you should decide when to upgrade or migrate.

Migrate

It would be prudent to test any upgrades, if you can.  Virtualisation technologies make this very achievable.  You can copy your existing servers, be they physical or virtual, to an offline virtual environment and perform a dress rehearsal of your upgrade / migration.  You can do it as often as you like, perfecting the technique and identifying any issues with your process in an offline situation, without affecting any end-users or customers.

You should also take a full system backup/image of your live systems before carrying out any open heart surgery on them.  In the event of something unexpected happening, you can always revert to your pre-upgrade state.

Why should I do it?

In May 2014, it was estimated that there were 11 million installations of Windows Server 2003 in existence.  Because no security patches will be released after the 14th of July 2015, any vulnerabilities that are discovered in Server 2003 after this date will not be patched.  It's likely that many sysadmins will not upgrade some servers, for a variety of reasons, leaving them vulnerable to future security attacks.

As we near the date, there may well be vulnerabilities, not yet documented, that have been discovered by individuals or groups with nefarious intentions. Late July 2015 might be a time when a number of new vulnerabilities and exploits are published.  Time will tell.


Sunday, 12 April 2015

Using Netstat to identify what process has a TCP or UDP port open

There can often be times that you'd like to know what process on your computer is listening on a particular TCP or UDP port.  For example:

  • You have a few different software products on your machine and you do not know which one has a particular port open
  • You are trying to identify malware or spyware on a computer

Short Version
Use netstat -ano to see what processes are associated with different open ports

Long Version
Netstat is a great tool for seeing what TCP or UDP ports are open on a Windows computer - client or server.  The most commonly used netstat -a command will show a list of all ports that are being listened on by the computer.  
However, using netstat -ano will also show the PID (Process ID) that owns each open connection.
netstat -ano
After running this, you can pop over to Task Manager and on the Processes tab you can see what program is being referred to.  Just make sure that you're viewing the PID column.

This is  a great way to identify what process is open and awaiting incoming network connections on your computer - and it's built right into the OS - be it Windows XP, Windows 7, Windows 8 or on the server side - Server 2003, Server 2008 or Server 2012.

Friday, 10 April 2015

VMware vSphere 6 Client - Storage Views Tab Missing

I updated our VMware ESXi 5.1 and vCenter 5.1 environment to version 6 this week (more on that later).  After this, I couldn't find the Storage Views tab, which is a plugin that I use regularly to ensure that we don't have any snapshots that have been forgotten about.  I've nearly put myself in trouble in the past by forgetting about a snapshot that I've taken and nearly not had the space to merge the snapshot back.

After some investigation (and finding nothing) I got in touch with VMware support who were great as always.  It seems that the Storage Views tab has been discontinued from vSphere 6.0 but they didn't update the release notes and documentation to tell people about it.

Thankfully, there's an easy way to sort it out.

Short Version
Create an alarm to let you know when a snapshot grows to a specified size.

Long Version

  1. Select the required level in your vCenter environment (e.g. Datacentre level) and select the Alarms tab.
  2. Select the Definitions view and right-click in the white space to create a new alarm
  3. Give the alarm a name, tell it to monitor Virtual Machines and to look for specific conditions.
  4. Right-click in Triggers, select New Trigger and change the type to VM Snapshot Size.
  5. Set the condition to 'is above' and decide what Gb value you want to be warned at and then alerted at.  Nothing is required in the Condition Length fields

vSphere Client Alert Settings

Bear in mind that different VMs will have different base snapshot sizes due to different RAM amounts, so you might need to play around with your values.  You could also create a more specific set of alarms, targeted at different machines.

New Blog

I'm starting this blog to hopefully help other sysadmins get the answers to some problems that they find perplexing.  As a systems administrator, I have managed lots of different technologies since I started out in 1996:

  • Windows 3.1 (and 3.11)
  • Windows NT (Workstation and Server)
  • Windows 95 and 98
  • Windows 2000 (Workstation and Server)
  • Windows Server 2003
  • Windows XP
  • Windows Vista
  • Windows Server 2008
  • Windows 7
  • Windows Server 2012
  • Windows 8 and 8.1
  • Windows 10

While I never once used Windows ME, it looks like I owe a great deal to Microsoft!  I also manage Exchange Server, a bit of SharePoint and the whole range of client applications.  I've been using VMware ESX server since v 3, through versions 4, 5, 5.1 and now 6.0.  I do a small bit of Citrix XenApp.  To assist with the management of all of these systems, I manage McAfee ePO, WSUS, a web filter, an email filter and much more.

During all of these years experience, I regularly encounter perplexing issues.  Most of the time, knowledge, experience or a quick Google will sort out any problem.  From time to time, I will encounter an issue that requires throwing the kitchen sink at it to get a resolution.  It is to help others who have the same odd issue, that I create this blog.

I will bounce around a whole load of different technologies with ideas and solutions that I've found to specific issues.  I hope it gets you out of a spot some day.