Friday, 29 May 2015

Extend the System Drive of a Windows Server 2003 Virtual Machine

Increase the size of the system drive of a Windows Server 2003 virtual machine

So, you have a Windows Server 2003 machine in a VMware or Hyper-V environment and you want to increase the size of the C: or System drive.  After you have allocated more space on the virtual hardware side, your Windows server may recognise it but not let you work with it.  When you try to use diskpart to extend the disk, you might get an error that says:

The volume you have selected may not be extended.  Please select another volume and try again.

The volume you have selected may not be extended.  Please select another volume and try again.

Fortunately, this is quite straightforward to get around.  Unlike Windows Server 2008 and 2012, this cannot be done on the fly (without 3rd party tools) so a reboot is required.  Here's what to do.

Short version

Boot off a Windows 2008 DVD, go to Repair and use diskpart to extend the volume into the free space.
Diskpart - increasing the size of a disk

Long Version


  1. Boot the virtual machine from a Windows 2008 DVD.
  2. When it boots up, select your language and choose to Repair the installation.
  3. Select the command prompt.
  4. Run diskpart to access command line disk tools
  5. Type list disk to identify the number allocated to the disk that you want to extend
  6. Type extend disk 0 (where 0 is the disk that has the free, extendable space)
  7. Type exit and reboot to make use of the extra space.  Your virtual machine might need another reboot as it thinks there's new hardware there, so now would be a good time to do it.
As always, it would be prudent to backup up any data prior to this procedure - just in case.

Friday, 8 May 2015

Microsoft Exchange - Automatically Forward Emails From External Senders

Automatically forward emails from external senders to internal and external recipients


Consider a scenario where every email that you receive from an external email address to a specific email account, perhaps an alert/monitoring account, needs to be sent onto a number of people - some internal to your organisation and some external.

It's possible to do this with a rule in Outlook, but you can also do it administratively from your Exchange server.  Here's how to do it.

  1. Assuming that all of your internal recipients are already on your Global Address List, create Contacts for the external recipients with their email addresses in the Exchange Management Console.
  2. Create a distribution group that contains all of your internal and external contacts.
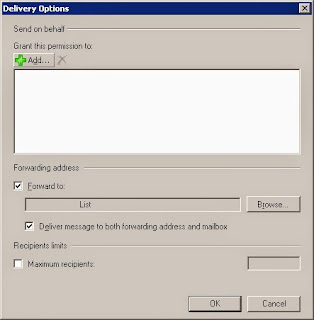
  3. Go to the properties of the email account that will be receiving the original or trigger email and go to its delivery options.

  1. Browse for the group that you want to forward to and if you want the original recipient mailbox to continue to receive the emails, rather than just forward them, tick the box for 'Deliver message to both forwarding address and mailbox'.
Microsoft Exchange - Distribution Group Message Delivery Restrictions

  1. Now, to ensure that all recipients will receive the email, go to the properties of the distribution group and in the Message Delivery Restrictions for it, untick the box to 'Require that all senders are authenticated'.
This last bit is a bit of a gotcha and not doing it might be a cause of an undeliverable message like this.
Delivery has failed to these recipients or distribution lists:
list@xyz.ie
Your message wasn't delivered because of security policies. Microsoft Exchange will not try to redeliver this message for you. Please provide the following diagnostic text to your system administrator.

Diagnostic information for administrators:
Generating server: xyz.ie
list@xyz.ie

#550 5.7.1 RESOLVER.RST.AuthRequired; authentication required ##rfc822;xyz@abc.ie

That should be it.  It's a useful, centralised way to do this from your Exchange server.

Tuesday, 5 May 2015

Sysinternals Autoruns - Comprehensive Startup Identification

Sysinternals Autoruns - comprehensive startup processes identification

I was looking at my Dad's home PC that had some malware on it and despite my brother cleaning up most of the offending software, there were still some annoying messages at startup indicating that although the offending .DLL had been removed, there was still something calling it and trying to launch it at startup.  The RunDLL error message that was being seen was:
There was a problem starting
C:\PROGRA~1\COMMON~1\System\SysMenu.dll
The specified module could not be found.
MSConfig.exe is a built-in Windows tool for showing some startup processes.  Unfortunately, there are many places for a startup process to hide that MSConfig doesn't show.
MSConfig System Information

Luckily for us, Mark Russinovich has created a fantastic tool called Autoruns that shows what processes are being launched and where they are being started from.
Sysinternals Autoruns
The initial screen will show you all of the different startup points - e.g. the Startup folder, HKLM\Software....\Run etc. with the programs and modules that are being launched from each

When you see a line highlighted in yellow, this indicates that the program/module being called no longer exists, but the call still exists.  You can even do a Internet search for details on a particular line right from the application!

The particular piece of rogue software that was troubling my Dad was being started as a scheduled task that had a trigger of 'At logon of any user' selected for its run time.

For me, Autoruns is an important tool in any Sysadmin's toolkit and it will run on Windows XP, Windows Vista, Windows 7, Windows 8 and Windows 8.1.  Although probably less necessary, it will of course run on the server operating systems too - 2003, 2008 and 2012.

Friday, 1 May 2015

VMware ESXi - Brocade Fibre Channel (FC) HBA Installation

Installation of Brocade 425/825 Fibre Channel HBA Drivers on ESXi 5

This is a slightly out of date article, but might be of help to some people.

Brocade's adapter business seems to have been bought by QLogic, so you will need to go there to get the drivers.

  1. Download the drivers  for the Brocade 425/825 FC HBA from here: http://driverdownloads.qlogic.com/QLogicDriverDownloads_UI/DefaultNewSearch.aspx
  2. Upload the driver to your ESXi server using the Browse Datastore feature.
  3. Enable SSH on the ESXi server (Configuration tab...Security Profile...Properties) and start the SSH service.
  4. Put the ESXi server into Maintenance Mode.
  5. Use Putty (or similar tool) to connect to the server and use these commands. Note that my driver file was called BCD-bfa-3.2.1.0-00000-offline_bundle-1108413.zip

  • cd /vmfs/volumes/datastore/<YourUploadedFile>
  • cp BCD-bfa-3.2.1.0-00000-offline_bundle-1108413.zip /tmp
  • esxcli software vib install -d /tmp/BCD-bfa-3.2.1.0-00000-offline_bundle-1108413.zip
  1. Once you get the success message, reboot the ESXi server and exit maintenance mode.
  2. Confirm that the HBA has been installed by going to the host...Configuration Tab...Storage adapters.
That should be it!